1:
|
Palette pane: The nodes on the palette are listed according to their functional categories. The nodes can be used to request, inject, process, and output data. You can also choose development-oriented nodes for tasks such as viewing debugged outputs or adding comments. Click and drag the required nodes onto the open sheet to create a flow. See Creating a Basic Flow for more information.
|
2:
|
Filter nodes field: Use the filter nodes field to find a particular node.
|
3:
|
Sheet tab: The name of the subflow displayed on the sheet. A flow can consist of any number of subflows, and each one is displayed on its own sheet. Double-click the tab header to open the Edit flow pane, where you can do the following:
| • | Change the name of the subflow. |
| • | Toggle the status of the subflow between "Enabled" and "Disabled". |
| • | Add a description for the subflow. |
| • | Delete the subflow. The Delete button is enabled only if there is more than one sheet for the flow. If you accidentally delete a subflow, press the Ctrl and Z keys to restore it. This action will undo all of your changes in order, so be careful when using it. |
|
4:
|
Node: Click a node to view its information on the info pane on the right of the screen. Double-click the node to open the Edit node pane, where you can configure the node using the Properties  , Description , Description  , and Appearance , and Appearance  tabs. To copy a group of nodes and paste them onto a different sheet, click and drag a box around them, or press the Ctrl key and click each individual node. You can then copy the nodes with the Ctrl + C keyboard shortcut, then paste the nodes into a different sheet with the the Ctrl + V keyboard shortcut. Alternatively, you can use the ≡ Menu button > "Export" and the ≡ Menu button > "Import" function to copy and paste the selected nodes. tabs. To copy a group of nodes and paste them onto a different sheet, click and drag a box around them, or press the Ctrl key and click each individual node. You can then copy the nodes with the Ctrl + C keyboard shortcut, then paste the nodes into a different sheet with the the Ctrl + V keyboard shortcut. Alternatively, you can use the ≡ Menu button > "Export" and the ≡ Menu button > "Import" function to copy and paste the selected nodes.
|
5:
|
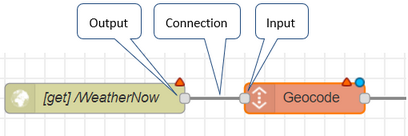
Node connection: To create a connection between two nodes hover the mouse pointer over the output of one node to the input of another node (or vice-versa). To remove a connection, click the connection then press the Delete key. Not all nodes include an input and an output: some may have only one, or neither (for example, comment nodes).
|
6:
|
Sheet: The center pane displays each flow or subflow on its own sheet. Click the sheet tab to open the sheet and view the flow.
|
7:
|
Add Flow button: Click the Add Flow  button to add a new sheet. You can then create a new subflow on the sheet. You can add any number of sheets to a flow. button to add a new sheet. You can then create a new subflow on the sheet. You can add any number of sheets to a flow.
|
8:
|
List Flows button: Click the List Flows  button to view a list of the subflows in a dialog box. Select a subflow from the list to open its sheet. button to view a list of the subflows in a dialog box. Select a subflow from the list to open its sheet.
If the list of subflows is very long, you can use the search field on the dialog box to find a particular subflow. Enter part or all of the subflow name or subflow ID to find it in the list. Note that this search field also searches for nodes in the subflows of the open flow.
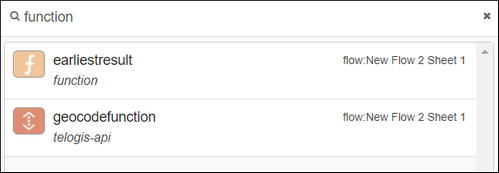
To search for a node, enter part or all of the node name, ID, or type. For example, if you entered "function" in the search field the results could include a node of type "function" and a node with the term "function" in its name, as shown in the following screenshot.
|
9:
|
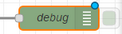
Deploy button: The Deploy button is only enabled if you have made changes to an existing flow or subflow; or if you have created a new flow or subflow. You must deploy (or re-deploy) new or modified flows and subflows before the changes can be used. Nodes that have not yet been deployed are marked with a blue dot.
Click the Deploy button to save and deploy the open flow (this action saves and deploys all subflows within the flow). If some nodes in a subflow are not properly configured, a warning message is displayed. Click the Confirm deploy button to deploy the flow anyway. You can return to the flow later to configure the nodes.
By default, clicking the Deploy button performs a full deployment. If you do not want to do a full deployment, click the Deploy drop-down arrow to set the functionality of the Deploy button.
|
10:
|
Deploy drop-down arrow: Click the Deploy drop-down arrow to open the menu and set the functionality of the Deploy button.
| • | Full - Select this to save and deploy everything in the open flow (including all subflows). This is selected by default when you open a flow. |
| • | Modified Flows - Select this to deploy the open flow and its subflows, but only if they have been modified. |
| • | Modified Nodes - Select this to deploy changed nodes within the open flow and its subflows. |
| • | Restart Flows - Select this to restart the open flow. |
|
11:
|
Menu button: Click the ≡ Menu button to access options available for the flow:
| • | View - Includes options for the sheet grid, whether to show or hide items including the node status, sidebar, configuration nodes, and others. |
| • | Import - Lets you import nodes by either pasting JSON onto the clipboard or by selecting nodes from your Library. |
| • | Export - Lets you export any currently selected nodes to JSON or to your Library, so that you can easily reuse the nodes. This option is grayed out if no nodes are selected. |
| • | Configuration nodes - Select this to open the config tab in the Info pane. The config tab provides single-view access to all configuration nodes added to your flow, such as the often-used api-config node. |
| • | Flows - Select "Add", "Rename", or "Delete". |
| • | Subflows - Allows you to create a subflow (or locking subflow) from scratch, or to create a subflow from a group of nodes you have currently selected on the sheet. Any subflows you create are added as nodes in the subflows group on the nodes palette, so that you can easily insert the subflow where needed inside another flow. Note that if you add a locking subflow, these can only be run one at a time. This means that if you have multiple inputs that call the same subflow, each input must wait for the previous input to complete its run through the subflow before being executed. |
| • | Manage palette - Select this to open the User Settings dialog box > Palette tab. See the Node-RED Palette Manager documentation for information about using the Palette tab. Note that Verizon Connect offers support for the currently installed nodes. Verizon Connect may not be able to offer support for other nodes that have been installed. |
| • | Settings - Select this to open the User Settings dialog box > View tab. Here you can configure how the flows and subflows are displayed on their sheets. |
| • | Keyboard Shortcuts - Select this to open the User Settings dialog box > Keyboard tab. Here you can view and edit the keyboard shortcuts that can be used when working with the flow. Click a keyboard shortcut listed on the tab to create or edit the shortcut. Enter part or all of an action (for example, "copy" or "toggle") in the filter field to filter the list of shortcuts. |
| • | View Tutorial/Help - Select this to view the Flows online Help. |
| • | v#.#.# - Indicates the current version of the flow. Click to view a list of changes for the current and previous versions. |
| • | Open fullscreen editor - Select this to open the fullscreen code editor in a new browser tab. By default, you can use it to edit tde template, function, template, indy, and static-file nodes. For more information about using the editor and how to extend it to edit other nodes, see Using the fullscreen editor. |
| • | Open profiler - Select this to open the profiler in a new browser tab. |
| • | View runtime logs - Select this to view runtime logs captured for the flow. |
| • | Open revision editor - If you manage your flow code using Git, click this option to open the Revision Editor in a new browser tab, where you can view past revisions, commit changes, and push changes to your repository. |
|
12:
|
Info pane drop-down menu: Lets you select which information is displayed on the info pane. Options are: "Node information", "Debug messages", "Configuration nodes", and "Context data".
|
13:
|
Debug button: Select this to view debug information on the info pane. This can include any information injected into a debug node on the canvas, or any error, log or warn messages received.
|
14:
|
Information button: Select this to view node or flow information on the info pane. If a node is selected, the node's information is displayed. If there are not any nodes selected, information for the flow is displayed.
|
15:
|
Info pane tab: Displays information about the flow or selected node. The information that is displayed depends on which option you selected from the Info pane drop-down menu  . .
|
16:
|
Toggle navigator button: Click this to open or close the navigator window. This window allows you to navigate around the sheet (useful when there are many flows on the sheet).
|
17:
|
Zoom controls: Zoom in and out of the open sheet using the zoom controls:
| • | Click  to zoom out. to zoom out. |
| • | Click  to reset the zoom level. to reset the zoom level. |
| • | Click  to zoom in. to zoom in. |
|
18:
|
Palette collapse/expand controls: Click Collapse  to collapse all of the categories in the palette. Click Expand to collapse all of the categories in the palette. Click Expand  to expand all of the categories in the palette. to expand all of the categories in the palette.
|

 Previous
 Next
Next Print
Print