Developer Console
Use the Developer Console to view the status of your existing flows, and to create, deploy, and manage your flows. The Developer Console is not used to edit or construct the flows themselves - this is completed in the Flow Editor.
The flows listed on the Developer Console are divided into three sections:
| • | Development flows: This section contains flows that are still under development. Each developer can have up to five active (running) development flows at a time. Development flows can be edited using the Flow Editor. They can be converted to production flows using the Flow admin menu > "Change environment" option. Note that development flows may be stopped during an upgrade, and the flow may require a manual restart. |
| • | Templates: This section contains flows templates. See Creating Flows Templates for more information. |
| • | Production flows: Contains flows that are live and actively serving end users or clients. If a production flow is stopped for some reason, it is automatically restarted. A production flow cannot be directly edited, but can be converted to a development flow using the Flow admin menu > "Change environment" option. The flow can then be edited and reverted back to a production flow using the same menu option. |
|
The Developer Console is the first screen you see after logging in to Verizon Connect® Flows™. |
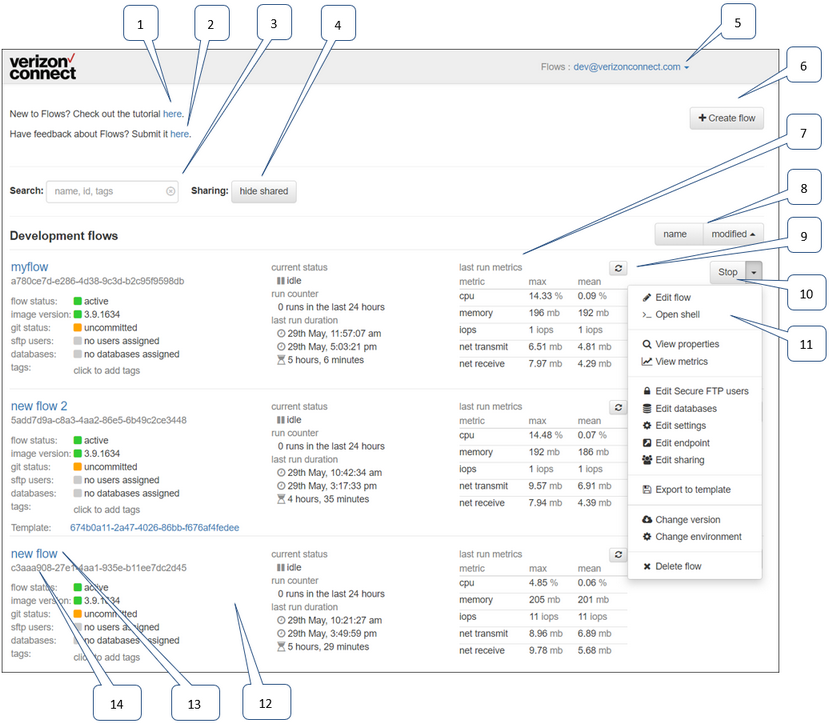
1: |
Tutorial link: Click the link to open the Flows Help in a new tab. |
||||||||||||||||||||||||||||||||||||||||||
2: |
Feedback link: Click the link to open the Submit feedback dialog box. |
||||||||||||||||||||||||||||||||||||||||||
3: |
Search field: Use the Search field to search for a particular flow. |
||||||||||||||||||||||||||||||||||||||||||
4: |
Sharing: Click the hide shared button or show shared button to hide or show flows that have been shared with you. |
||||||||||||||||||||||||||||||||||||||||||
5: |
User admin menu: Click the down arrow by your username to sign out, change your password, add, or edit secure FTP users, or register a new developer on your company's account. Some options are only available to Administrators. See Managing user accounts for more information. |
||||||||||||||||||||||||||||||||||||||||||
6: |
Create flow button: Click the button to open the Create flow dialog box, where you can either create a new flow from scratch, create a flow from a template, or clone a flow from a Git repository. See Creating a Basic Flow and Creating Flows Templates for more information on creating flows. |
||||||||||||||||||||||||||||||||||||||||||
7: |
Flow metrics: The metrics table displays information related to the system resources used the last time the flow was run. |
||||||||||||||||||||||||||||||||||||||||||
8: |
Sort buttons: Click the buttons to sort the list of flows. Each section (Development flows, Templates, and Production flows) has its own sort buttons. |
||||||||||||||||||||||||||||||||||||||||||
9: |
Refresh button: Click the Refresh button to refresh the flow information and the metrics table. |
||||||||||||||||||||||||||||||||||||||||||
10: |
Action button: For development flows, the action button can be Stop (to stop flows that are running) or Restart (to restart flows that have stopped). For production flows, the action button is Refresh only, since production flows cannot be stopped. Click the Refresh button to refresh the flow information and the metrics table. |
||||||||||||||||||||||||||||||||||||||||||
11: |
Flow admin menu: Click the down arrow to open the admin menu. The options available in the menu depend on which environment the flow is deployed to, or if it is a template.
|
||||||||||||||||||||||||||||||||||||||||||
12: |
Flow information: The left side and the center of the row contain general information about the flow. |
||||||||||||||||||||||||||||||||||||||||||
13: |
Flow name: The flow's name is displayed in blue text if the flow has the current status of "running" or "idle". The flow's name is displayed in gray text if the flow has the current status of "stopped". Click the name of the flow to open it in the Flow Editor. |
||||||||||||||||||||||||||||||||||||||||||
14: |
Flow ID: The flow's unique ID. |
 Previous
 Next
Next Print
Print