Flows that serve web pages can be embedded directly within the Verizon Connect platform for ease of access by platform users, and to simplify authentication and access management. A management console is provided in the platform to specify details such as the flow to display, how the menu link is displayed to platform users, and which subusers or roles can access a given flows web UI within the platform.
Flows shown in platform must be configured beforehand using the conventional Flow Editor UI. The platform Flows console described on this page includes no flows development or debugging functionality of its own.
Create a Flow-Sourced Tab in Fleet
To embed an existing flows web UI into the platform interface, follow the steps below. The Flows screen can be accessed by users and roles who have access rights. You can configure the flow, how it will be run, who can access it, and the link name and icon that is used to represent the flow in platform's main menu.
You must be a Verizon Connect Fleet administrator, and have the Verizon Connect Flows feature enabled (HasFlows) on your platform account, to complete the steps described below.
1.
Sign in to Verizon Connect Fleet using an account with administrator rights, and with the Verizon Connect Flows customer account option enabled (configured via the Wanaka web interface).
2.
From the Tasks section of the navigation bar choose Flows. The Flows screen opens.
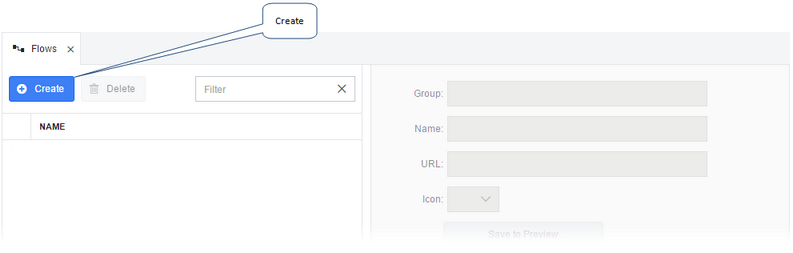
3.
Click the Create button in the upper left corner of the Flows screen. The right pane of the Flows screen is then enabled, allowing you to enter the platform configuration details of your new platform flows tab.
4.
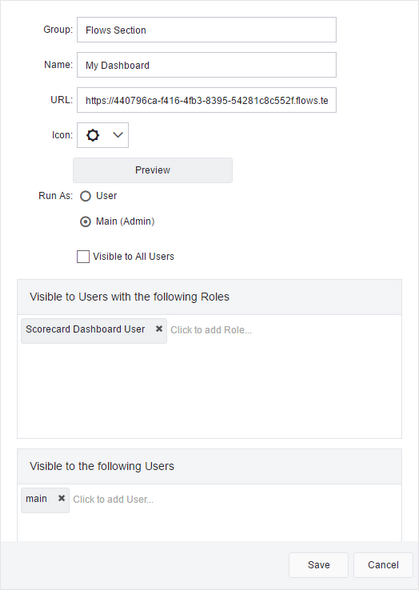
Enter the following information:
o
Group: Enter the arbitrary name of a group that this flow will be displayed under in the platform navigation bar. For example, if you enter the name "Flows", a new "FLOWS" section will be added to the navigation bar. This field is required.
o
Name: Enter the label to display in the Group section of the navigation bar. This field is required.
o
URL: Enter the URL of the previously-created flow, including the web page endpoint. For example, https://440796ca-f416-4fb3-8395-54281c8c551d.flows.telogis.com/dashboard. This field is required.
o
Icon: Select the icon you want to display beside the Name label in the navigation bar.
o
Preview: Click this button to test the configuration in a new tab, simulating the screen a real user would see.
o
Run As: Choose the account level the flow will be run under: either the permissions of the current platform user who may or may not be an administrator, or the main user, with administrative privileges.
o
Visible to All Users: Select the check box to make the generated flows UI visible to all authenticated users in the platform. When the check box is clear, only the users with the roles specified, or the individual subuser accounts given permission, can view the link and flow in platform.
o
Visible to Users With the Following Roles: Click within the field and then select the platform roles that will have permission to view and use this flows web UI from the platform menu. Roles are configured from the Roles screen, under the Tasks section of the navigation bar. See the Platform Help for more details.
o
Visible to the Following Users: Click the field and select the platform subuser accounts that will have permission to view and use this flows web UI, and access the Group section of the navigation bar.
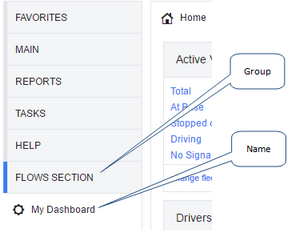
5.
Click Save. Refresh the platform screen to view the new group and link that you specified above in the navigation bar:
Authenticating Fleet Users
When the endpoint is embedded into the platform as described above, the HTTP-In node seamlessly handles session validation. You may also choose to use the Verizon Connect Auth server as a means of authentication, independently of this process. This allows the flow to be accessed directly (that is, not from within the platform) if the user has a valid TDE session ID or platform authentication token.
It is important to note that the platform Flows administration interface only allows you to specify which users and roles may view the flow within the platform. It is not intended as a secure gateway to the flows themselves. If the flow is accessed from outside the platform, and if the user has a valid session ID or authentication token, the flow is displayed. The flows system does not check with the platform configuration to determine whether a specific user has been given access to a specific flow.
Access to individual HTTP flows is configured from the node itself, using the Node Editor and the URL and Use Verizon Connect Auth controls. By default, the Use Verizon Connect Auth check box is automatically selected on all new Flows 2.0 HTTP nodes. If an HTTP node was created using a previous, older version of flows, the node does not have this check box selected by default and may need to be edited. This check box must be selected if the flow is to be embedded and displayed in the platform. To edit this setting on a node:
1.
Double-click the HTTP-In node in the Flow Editor. The Node Editor dialog box opens.
2.
Select or clear the Use Verizon Connect Auth check box. If cleared, you can click Done now. If selected, move to the next step.
3.
Specify the session cookie's folder location in the URL field. This location is used to check for a valid platform session cookie, and points to the flows instance using the format https://[endpoint].flows.telogis.com/[operation] where [endpoint] is the name of the endpoint or the flow ID. The URL is automatically constructed and requires only a folder location to be specified. For example, if the endpoint is "foo", the URL "/my/folder/" is used to point to https://foo.flows.telogis.com/my/folder. This field is not required if the flow is accessed via the platform.
If the URL is specified, but the cookie is not available, for example if the endpoint is accessed directly as a standalone screen outside of the platform, then the user is prompted to enter their platform login credentials.
4.
Choose the environment that the flow will be run against. This is typically "Production" or "Preview", but may also be "Custom", then click Done.


 Previous
 Next
Next Print
Print