When you create a new flow, you also have the option to create a private GitLab repository for it. Version controlling a flow makes it easy to track changes, revert to a previous version if needed, and create new flows by cloning from an existing repository.
Version Control Process
The workflow described below is the general process to follow when you version control a flow.
1.
From the Developer Console, click the Create flow button in the upper right corner of the screen. The Create Flow dialog box opens.
2.
In the Create flow dialog box, select Default in the Revision control section. This option automatically sets up a git repository for the flow.
3.
Create the flow in the Flow Editor, and deploy it at least once.
4.
Use the Revision Editor to manage changes:
a.
Open the Revision Editor: click the ≡Menu button at the upper right corner of the Flow Editor, and select "Open revision editor".
b.
Click through the files listed under Git status to view all of your changes.
c.
Click Commit to save your changes locally.
d.
Click Push when you want to send your changes upstream to the remote repository.
e.
Repeat the steps above to view, commit, and push changes while you work.
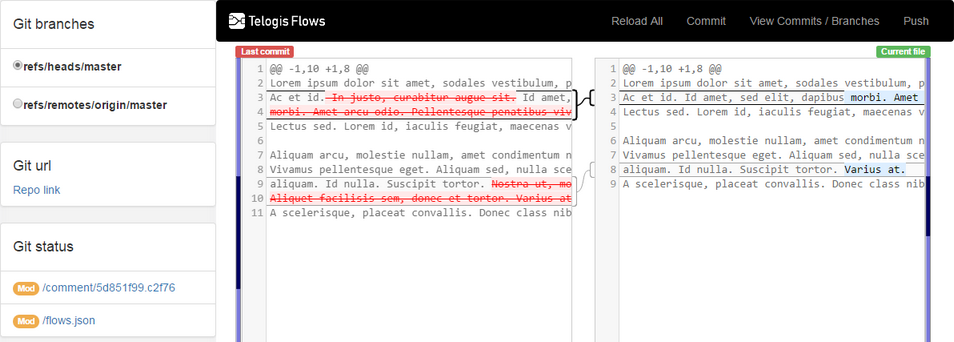
Using the Flow Revision Editor
For flows configured to support revision control, developers can manage changes using the built-in Revision Editor in the Flow Editor.
To open the Revision Editor, click the ≡Menu button at the upper right corner of the Flow Editor, and select "Open revision editor".
From the Revision Editor, you can do the following:
•
Change branches To switch to a different branch, click your preferred branch in the Git branches list. Selecting a branch updates the flow’s files in the working tree to match the version in the branch you chose.
•
Open the repository in GitLab Below Git url, click the Repo link. If you are directed to a sign in page, enter your Flows Developer credentials.
Only the flow's Owner can access the flow directly in GitLab.
•
View changes All modified files are listed on the left in the Git status list. Click a file to view the Last commit compared to the Current file.
•
Commit changes When you are happy with the changes you have made, click Commit to add and commit your changes into the local flow's repository. In the dialog box, enter a Git commit message, then click Submit. After committing your changes, the Git status list updates to show that you have a clean repository.
•
View commits on branch To view a history of commits on the selected branch, click View Commits / Branches.
•
Create branches Click View Commits / Branches, then click the commit from which you want to create a branch. From the Create new branch dialog box, enter the new branch name in the Name field, then click Submit. You are automatically switched to the new branch you created, as shown in the Git branches list.
•
Push changes Click Push when you are ready to push your changes to the remote GitLab repository for your selected branch. In the dialog box, select the check box next to the repository you are pushing to, then click Submit. When pushing your changes, you only need to include a username and password if the repository you are pushing to was set up outside of Verizon Connect Flows.
•
Reload diffs If you work on your flow while the Revision Editor is open, click Reload All to update the diffs listed under Git status.
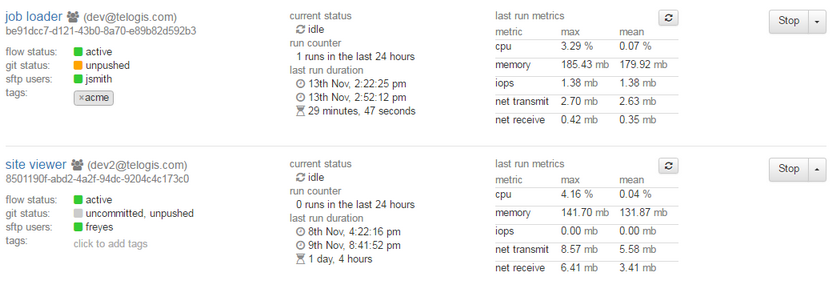
Viewing Git Status in the Developer Console
The git status of the flow’s working repository is displayed in the Developer Console. It indicates whether the flow is:
•
ok - No modifications have been made to the flow since the last push.
•
uncommitted - Modifications have been made to the flow that are not committed yet.
•
unpushed - Modifications have been made to the flow that are not pushed to the repository yet.
Deleting a flow in the Developer Console does not delete it in GitLab. To permanently remove the project from your Flows Developer account in GitLab, you must delete it from the flow's Project Settings page in GitLab.
Cloning a Repository
You can create a new flow by cloning another flow’s repository.
1.
From the Developer Console, click the Create flow button in the upper right corner of the screen. The Create Flow dialog box opens.
2.
In the Create flow dialog box, select Clone from repository in the Revision control section.
3.
Enter the following information:
a.
Flow name: Enter the name of the new flow.
b.
Git repo url: Enter the .git URL of the repo you want to clone. If you clone another Verizon Connect Flows project, the URL looks something like this: https://flows-git.telogis.com/group-flow-name-GUID/GUID.git
c.
Git repo username and password: If you are cloning a flow from a public repository, then entering a username and password is not required. However, to clone a private repository, you must enter credentials to access it. For example, if you want to clone another Verizon Connect Flows project using its Git repo URL, then you must enter the Flow owner’s username and password to access the repository.
d.
Accept any self signed SSL certificate: When this is clear, only valid SSL certificates are accepted. When selected, the flow accepts all SSL certificates, including self signed and invalid certificates. Select this option only if you understand the ramifications and have a specific need for this feature.
4.
Click Create. A new flow is created, cloned from the repository you entered.
Using Git From the Shell
Advanced users can use git directly from the command line rather than using the Revision Editor GUI. All of the standard git commands are available from the flow’s shell.
Getting started
1.
Open a terminal for the flow, then change to the git root directory located in /home/flow/src. If you start from a new terminal window, you can enter cd src to navigate to this directory.
2.
Configure git by adding the email address you use for your Verizon Connect Flows account and your name. This information is used when you commit and push to the flow’s remote repository.
 Previous
 Next
Next Print
Print